Categories
Finished miniatures Lightbox photos Miniature painting Miniatures Terrain Warhammer 40k

Catching up on lightbox pics: 40k terrain and a mantis

I snapped these back in January, of stuff I finished in December of 2022, and then forgot about them until now.

Sector Mechanicus dome/stack

I had a lot of fun building this piece. All of these sets interconnect so well that it’s satisfying to play around and find ways to work in “off-book” connections.

Ferratonic Furnace

I have a couple of these, so I felt free to assemble this one as a single piece — no modular lid. The Wraithbone railings and pipe fittings tie it to my Sector Manufactorum terrain.

There’s something therapeutic about drilling little bullet holes in terrain.

To matched the blasted and ruined look of my Manufactorum pieces, I added battle damage to the railings.

I assembled the platform and railings such that it can play nice with almost any walkway piece. The corner with the hazard stripes has a bite taken out of it with my hobby nippers.

Sector Mechanicus walkway

I clustered the railings in the center, leaving both ends and the “sides” of the ends free to connect with other walkways.

All of my ladders are carefully placed to as to mostly play nice with other terrain pieces.

I wanted this to fit in with my blasted-up Manufactorum stuff, so I used clippers and my hobby knife to tear chunks out of the platform. I kept the holes small enough to avoid being hazards for the actual miniatures.

Thermo-Exchanger Shrine and miscellaneous tank

Shipping containers and misc. bits

The bottoms are fully painted too, but not interesting enough to photograph. I paint the bottoms because these are so modular that they look good at weird angles, on their sides, etc.

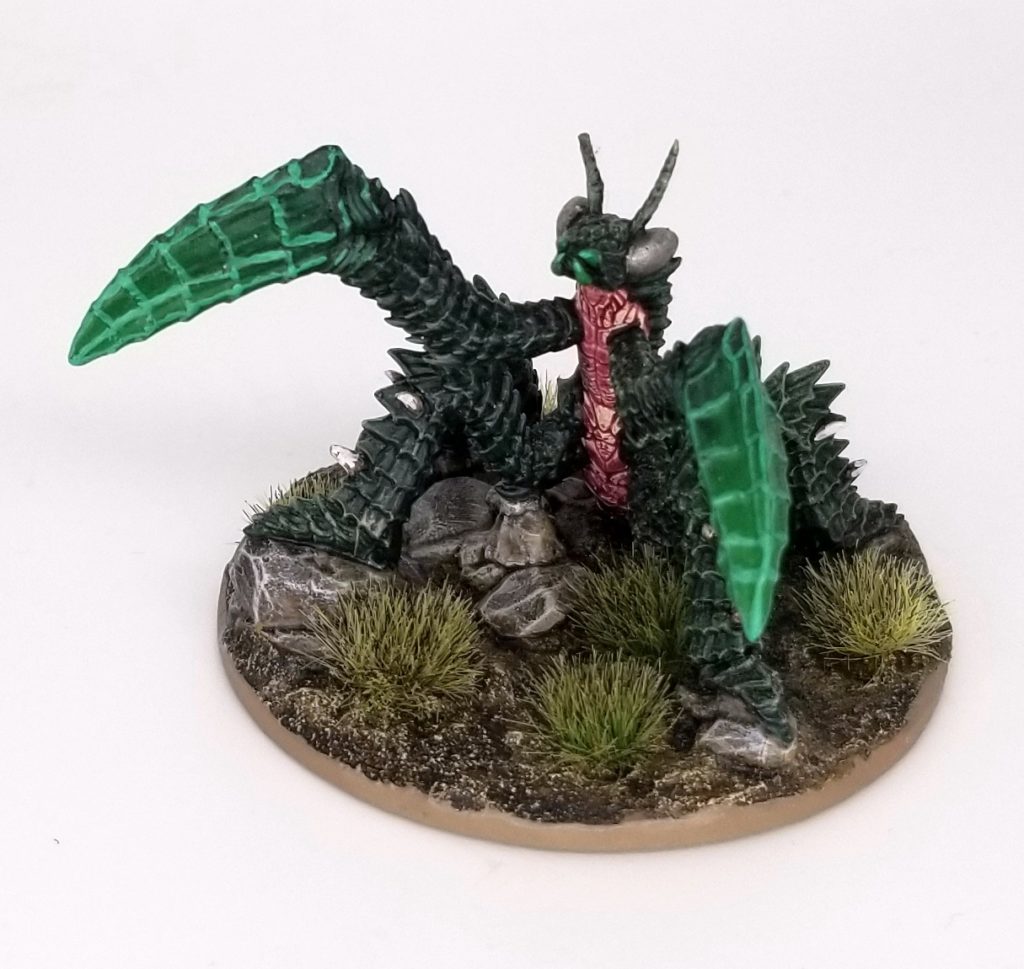
Giant dire mantis

My kiddo, Lark, loves preying mantises, so I painted this giant dire mantis (a 3-D print I bought on Etsy) as a Christmas present. I used some glazing and progressive drybrushing layers to try to make it look natural, and the overall model uses something like 19 colors. It was a ton of fun to paint.

And that’s it, I’m all caught up! Now back to assembling Brôkhyr Thunderkyn for my Votanni army.

Out now: The Unlucky Isles

The Unlucky Isles [affiliate link], the first system-neutral guidebook for my Godsbarrow fantasy campaign setting, is now on DriveThruRPG.
Categories
Kill Team Miniature painting Miniatures Terrain Warhammer 40k

40k Sector Mechanicus terrain color guide

I started my 40k terrain collection with pieces from the Manufactorum line, and then added a bunch from the Sector Mechanicus line — enough stuff that, if I built all of it, I could kit out a 2,000-point 40k board. My plan has always been to find a paint scheme that unifies these two themes, and after looking at lots of possibilities I settled on this one.

My goal here isn’t to replicate the studio paint schemes for Mechanicus terrain (although they’re great!), it’s to make my bombed-out table full of a mix of Manufactorum and Mechanicus pieces looks cohesive. I’ve gotten ideas from Warhammer TV videos and Google searches, referenced Citadel’s mini-guides for specific colors (e.g. Deathworld Forest), and used my Manufactorum color guide as my baseline.

In the dark future there are no bare bottoms

Tying Sector Mechanicus to Battlezone: Manufactorum

My approach is to follow these steps in this order. That entails a rattle can primer/base coat, tackling the biggest sections, completely finishing everything but the tiny details (pipes, plaques, handles, screens, wires, and the like), then doing those details (with no wash/highlight steps for them!), and lastly weathering the whole piece.

  1. Spray everything Leadbelcher. Tackle each piece in two stages: broadly, top and bottom. Flip them over and wait 15 minutes before spraying the second stage.
  2. Big stuff:
    • Stanchions and gantries: base coat the tops of the gantries Deathworld Forest (over the existing Leadbelcher primer/base coat); touch up any overspill with Leadbelcher; wash the stanchions and both sides of the gantries, starting with the undersides and waiting an hour before doing the rest; and then completely finish these sections (all the way up to top-level drybrushing). That way I can be messy with my washing and drybrushing before painting the other elements.
      1. Tops and edges of gantries: Deathworld Forest > Agrax Earthshade > Elysian Green drybrush > light Screaming Skull drybrush
      2. Undersides of gantries: Agrax Earthshade
      3. Stanchions: Agrax Earthshade > Ironbreaker drybrush > Necron Compound drybrush
    • Red metal (large plates, tanks, doors, some pipes): Khorne Red > Nuln Oil > Wazdakka Red drybrush > very light Squig Orange drybrush
    • Railings and large pipe joints (compatible with Manufactorum pipes): Wraithbone > Seraphim Sepia > Agrax Earthshade pin wash along seams/wherever they’d be really dirty > Tyrant Skull drybrush > Praxeti White drybrush, focusing on the high points and edges
    • Bare metal (ladders, chains, hooks, etc.): Agrax Earthshade > Ironbreaker drybrush > Necron Compound drybrush
    • Bronze: Warplock Bronze > Agrax Earthshade > Brass Scorpion on the relief elements
    • Big 3-D Cog Mechanicum: The metal elements are already done (silver spray, wash, drybrushes).
      • White: Corax White > Apothecary White contrast paint > light Praxeti White drybrush
      • Black: Corvus Black > Basilicum Grey contrast paint > light Eshin Grey drybrush
      • Eye: Corax White > Khorne Red > Evil Sunz Scarlet
    • Small Cog Mechanicum: The metal elements are already done (silver spray, wash, drybrushes), and these are all too awkwardly situated for me to do much else to — so I keep them simple.
      • White: Corax White > thinned-down Agrax Earthshade wash in the recesses
      • Black: Abaddon Black
    • Hazard stripes: Averland Sunset/Abaddon Black (use 3mm Vallejo hobby tape to mask them off) > very thin Agrax Earthshade wash to dial them back a bit
  3. Little details (wires, conduits, screens, etc.): Base coat in a single color (Averland Sunset, Macragge Blue, etc.) and vary these choices across the terrain pieces (especially duplicates!); it sounds like heresy, but these truly don’t need any follow-up coats/layers/etc.
  4. Weathering:
    • Rust: Thinned-down Skrag Brown > thinned-down Fire Dragon Bright
    • Verdigris: Nihilakh Oxide on bronze elements
    • Bullet holes: Shade them with the rest of whatever surface they’re on, then at this stage just fill them with Leadbelcher
    • Chipping and damage: Sponge on Rhinox Hide, focusing on the blasted edges and torn-away elements, but also randomly putting it everywhere that feels right

If you like this color scheme/approach, there’s nothing about it that’s unique to my setup; it should look dandy without the Manufactorum pieces to complement it.

Note that during assembly I’ve added battle damage and decay to my Mechanicus pieces: holes in gantries, missing ladder rungs, bullet holes, smashed railings, etc. My rules of thumb are: no section of gantry intended to mate with another at the table should be too badly damaged, as that would look weird if the other side didn’t match; and don’t overdo it. These aren’t ruins, like most of the Manufactorum pieces, but they have seen some shit.

Drilling holes and taking big bites out of my gantries (April 27, 2022)

My hope is that the mix of ruined and intact pieces, which is common to both terrain themes — out of the box in the case of Manufactorum, and added by me in the case of Mechanicus — will make the whole battlefield cohesive, immersive, and fun to look at.

Out now: The Unlucky Isles

The Unlucky Isles [affiliate link], the first system-neutral guidebook for my Godsbarrow fantasy campaign setting, is now on DriveThruRPG.
Categories
Kill Team Miniature painting Miniatures Terrain Tyranids Warhammer 40k WIP it good

WIP it good: Tyranid Warriors and terrain

I’m currently working on three things in parallel, all at different stages: my second Hive Fleet Balaur unit for Kill Team, three Tyranid Warriors; a batch of Manufactorum terrain; and a couple of larger Sector Mechanicus terrain pieces.

Tom Servo of Finland watching over three freshly-glued Warriors

These guys were every bit as fun to build as my Genestealers. And despite having no names, no personalities, no quirky equipment — none of the stuff I’m used to using as my roleplaying hooks for how to assemble and paint an interesting figure — these models are packed with opportunities to convey intent (nom nom nom), motion, and character.

I’m honestly surprised how much I enjoy building and painting Tyranids.

My Tyranid Warrior Fire Team: Venom Cannon, leader, and weapon beast

Since I’m combining pieces from two lines, Manufactorum and Mechanicus, for my table, I started out with the Mechanicus stuff by just faffing about and seeing how it looks alongside my Manufactorum pieces.

I love how modular the Mechanicus terrain is

Alongside creating interesting terrain, my goal is to balance the modularity of the Mechanicus kits with a desire for durable, functional pieces I don’t need to fuss with.

These kits can be painted in pieces and assembled at the table, then broken down and reassembled a different way the next time. But some of the elements, like the railings, are going to mar whatever you attach them too — and in any case, that level of modularity seems like overkill to me.

So instead I built four anchor pieces, all of them fully assembled and glued — and all of them capable of being combined in lots of different ways. I left space for a Ferratonic Furnace under the octagon at the back, but glued my second furnace to the platform up front. The long gantries can each accommodate one or two of the larger Mechanicus tanks being slid under them, and almost all of the “mating” ends of the gantries and platforms can be mixed and matched.

This took a couple of hours, but I’m happy with how my pieces turned out.

My four anchor pieces (just press-fit at this stage, not glued)

After sleeping on my choices, I tweaked a couple things here and there, picked two to start with, and got them glued together.

The Ferratonic Furnace and platform will be glued together after I’ve sprayed them both (to make it easier to reach all the little crannies behind the ladder, cables, etc.)

Then I shifted gears and did the first wash on four Manufactorum pieces I’d previously primed, with an eye to finishing a full Kill Team board worth of terrain as soon as possible.

I’ve yet to figure out the secret of not being messy with terrain washes

It’s a weird angle, but this is my current overflowing work area: freshly washed Manufactorum pieces at the bottom, a mix of finished and WIP Tyranids and terrain in the center, and my first two huge Mechanicus pieces waiting for a dry day so I can spray them.

My desk hasn’t looked like this in months, and I love it!

Shifting from working on 2,000-point 40k armies to Kill Team squads has been just the ticket for getting me jazzed about painting again. It’s also helped me find something to focus on with terrain, since I’ve got a much shorter-term goal than filling a Strike Force board: one Kill Team board, which is maybe 4 large pieces, 2 medium ones, and a handful of little bits.

Out now: The Unlucky Isles

The Unlucky Isles [affiliate link], the first system-neutral guidebook for my Godsbarrow fantasy campaign setting, is now on DriveThruRPG.