
Jawas are one of my favorite Star Wars aliens, and making a Jawa costume for Halloween 2010 sounded like fun. Looking at the one commercially available option, I wasn’t thrilled; for $60, it looked pretty meh. Once I got into researching better options, I knew I had to give making my own Jawa costume a shot.
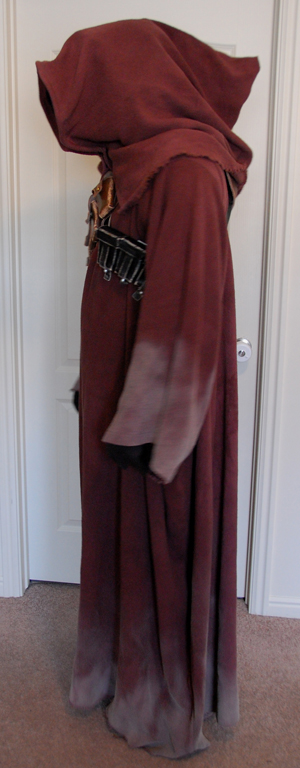
Here’s the finished product — the World’s Largest Jawa.
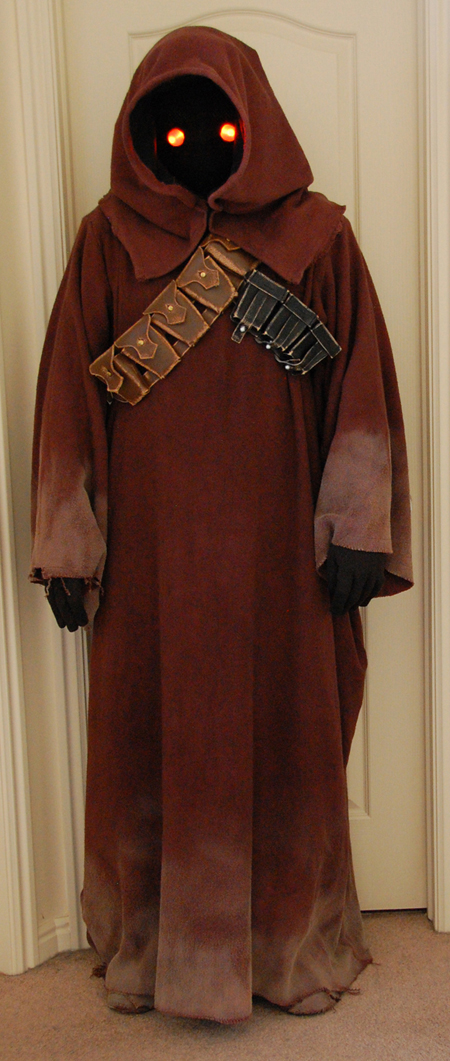
Partly because I was reading The Making of Star Wars at the time, I became fixated on making it as screen-accurate as possible, working towards the 501st Legion‘s standards for serious costumers as spelled out on the Krayt Clan website. There’s a lot of great info online about making a Jawa costume (some of which I’ve linked to below), but most tutorials and threads focus on making one for your kids. I wanted to be the World’s Largest Jawa (at 6’0″ and around 195 lbs.), so I had to tweak things to create an adult-sized Jawa costume.
It was a hell of a lot of work, so I figured I’d document it here in case I could save other folks some time and heartache. Going this route took Alysia and I about 20 hours (10 for the robe and hood, 10 for everything else not counting dyeing time) and cost around $200.
That’s not cheap, but a) it’s cheap compared to many screen-accurate costumes, and b) it’s an investment in a costume you can wear for years to come. The robe and bandoliers are quite durable; even if I have to replace the shoes or mask down the line, it will be relatively easy and inexpensive to do so.
Online Resources
I spent hours researching this costume, so I’m sure I forgot to include some awesome sites on this list — but I did keep track as I went, so this should be most of them. I’d also like to thank the folks on the Krayt Clan forums for their advice; Krayt Clan is the official branch of the 501st Legion for “denizens of the galaxy,” which includes Jawas and Tusken raiders.
Complete jawa tutorial
Harlan’s Workshop’s jawa outfit tutorial
Jawa costume thread on The Dented Helmet
TD8733’s jawa costume tutorial
Jawa on a shoestring
Keep to the Code thread on weathering
Krayt Clan’s official costuming requirements for jawas
Krayt Clan’s reference photos
Star Wars Trader’s prop reviews
TK1336’s jawa tutorial
TK409’s mask tutorial
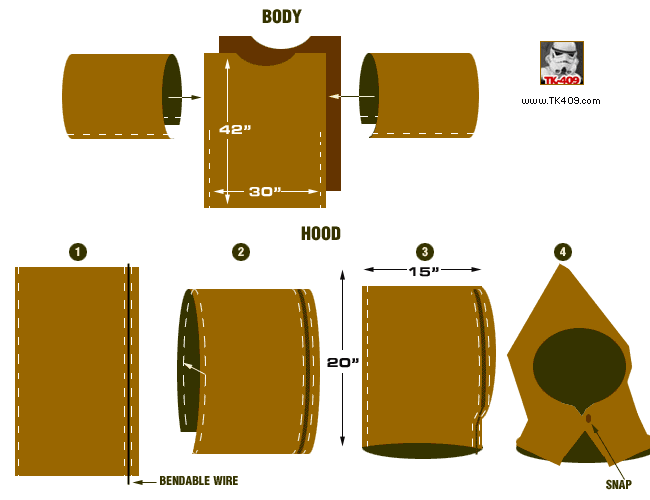
TK409’s robe pattern
Materials and Supplies
Here’s a complete list of what Alysia and I used to make this costume, including some stuff you likely already have (like electrical tape) for completeness’ sake. You’ll also need a sewing machine and someone who can sew (thanks, Alysia!).
There are lots of ways to skin this cat, but I can only speak to the materials I used — this approach worked for me, and I was happy with the results.
Costume Components
7.5 yards of natural monk’s cloth. This was $7/yard at Wal-Mart, the cheapest I could find (it’s $10/yard at fabric stores). I could have gotten away with 7 yards, maybe even 6, but I’m 6′ tall and wanted to some room for error (monk’s cloth shrinks a lot, too). Pre-dyed monk’s cloth is crazy expensive and might not actually be the right color; dyeing is easy and cheap.
1 yard of non-shiny, breathable black fabric. $6 at the fabric store. I wanted the furry/textured stuff I’d seen in online tutorials, but couldn’t find anything similar. I wound up using the stuff I picked up to cover the mask as well as make the cowl; if you find something better to cover the mask, you still need breathable cowl fabric.
1/2 a yard of black cotton fabric. About $3 at the fabric store. This is the hood liner.
A pair of dark brown jersey cotton gloves. $1 at Lowe’s. If you can find convincing fur to put on the cuffs, rock on; I couldn’t find any I liked, so I skipped that element.
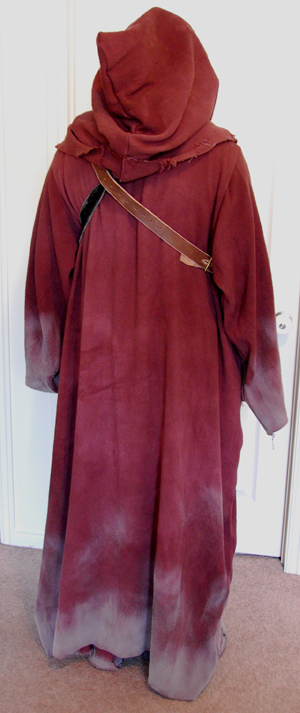
Bandoliers. There are lots of options for these, but I went with a bandolier (a replica 1903 .303 five-pouch bandolier, $45 + shipping from IMA), a wide, dark brown belt ($20 at Sears), and a replica ammo pouch (WWII Mauser pouch, $18 + shipping on eBay). This is a middle-of-the-road approach: the bandolier and pouch are screen-accurate; the belt isn’t, but it does keep costs down. Using leather as opposed to vinyl makes for much more convincing weathering and looks better overall. If you’re tooling a custom ion blaster holster, buying two bandoliers, etc., expect to spend more.
Crappy plastic goalie/Jason mask. About a buck at a local grocery store around Halloween.
2 1″ diameter plastic toy pods from a vending machine. These were ubiquitous when I was a kid, but surprisingly hard to find these days. $0.25 apiece at a grocery store; buy four in case you screw up a couple. These are the shells for the eyes.
Pre-wired orange LED “Jawa eyes” with a battery pack. $10 on eBay. The wiring is supposed to be pretty easy, but I’m not an electrical guy.
Crappy shoes or boots. $25 duck boots from Wal-Mart are pretty close to the real thing, but I just used an old pair of Vans from the basement to save money. You’re going to glue fabric to these, and if the robe is long enough no one will see whether they’re shoes or boots.
Supplies
2 bottles of RIT liquid dye in dark brown. $3 apiece, also from Wal-Mart. (I wound up buying four bottles so I could re-dye my fabric, but the re-dyeing didn’t actually help — two bottles was plenty.)
Large plastic tub with handles. 7+ yards of fabric takes up some room, and the handles make it easy to move. (The dye actually rinsed out easily, so you don’t need to buy a tub just for this purpose.)
A 1″ thick piece of soft craft foam. Around $4. Not every craft store carries the soft stuff, so you might have to poke around (I got mine at Hobby Lobby). It doesn’t matter what color this is — it goes inside the mask to give you some padding and create extra breathing room.
Hot glue gun and glue sticks. About $9. I wish I’d paid more than $6 for a better gun, but the crappy one I bought worked OK. Available at any craft store.
3′ of 14 guage coated wire. About $2 at Lowe’s. (Apparently 12 guage works just as well.) This is for shaping the opening of the hood.
150 grain sandpaper. A buck or two at Lowe’s; I needed two sheets to weather and distress the belt, ammo pouch, and bandolier. I also tried 100 grain and 220 grain; the former was too rough, the latter took forever.
Black electrical tape. About $2. This is for taping the wiring for the eyes to the mask (hot glue was way too messy).
Dark brown thread. $2 anywhere. I didn’t worry too much about matching the robe color perfectly (Jawas aren’t perfect).
Black shelf/drawer lining. $4 at grocery or craft stores. This is the stuff you lay in drawers to keep what’s in them from moving around — a kind of lightly tacky mesh. It goes over the eye holes to keep your eyes from being visible in the mask.
1 can of satin-finish spray paint, almond color. $4 at Wal-Mart; I used Krylon Satin Almond. This is used to spray sand/dirt stains onto the robe.
Jawas aren’t Perfect
The nice thing about this costume is that unlike other Star Wars costumes, Jawas aren’t shiny and perfect. They’re dirty upright rodents who steal shit, repair droids, and tool around the desert — not fashion plates.
This means your costume doesn’t need to be perfect to look good — and some sloppiness is desirable, in my opinion. One of the coolest things about the original trilogy is that everything looks dirty and lived in, and this suits Jawas perfectly.
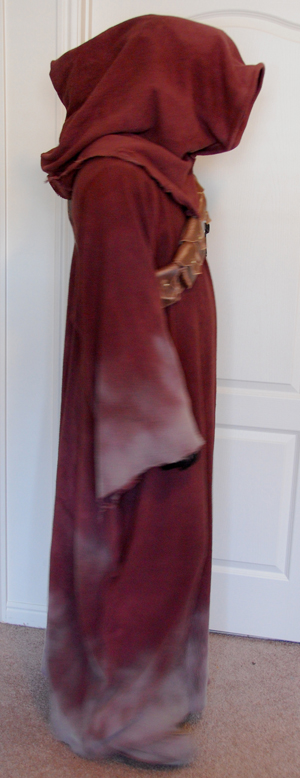
Ideally, this costume doesn’t look like a costume — instead, it looks like something a Jawa has actually worn while kicking around on Tatooine. Here’s a much larger shot of the costume that hopefully illustrates that.
Dyeing the Fabric
First things first: Monk’s cloth shrinks like crazy, so you need to wash it (cold/cold) and dry it (delicates with a sheet of fabric softener) before doing anything else.
Since the monk’s cloth started out natural, it then needed to be dyed. I half-filled my plastic tub with hot tap water, and then threw in both bottles of RIT dye along with one cup of salt. I let it steep for an hour, agitating with a broom handle every 15 minutes, then threw it in the washer on cold/cold with detergent. Then I popped it in the dryer on delicate with a fabric softener sheet, just like before.
It came out with some blotchy and light spots, so I threw it back in the dye tub for another hour and then washed and dried it again. That didn’t eliminate the blotches, so after a bit of research I decided it was because parts of the cloth hadn’t been completely submerged. So I bought two more bottles of dye, used more water, and didn’t agitate it this time around; it still wasn’t perfect, but that was where I stopped.
I decided that the imperfections were actually just fine, since I was planning to dirty up the robe anyway — I thought some subtle blotches would actually look pretty cool, and as it turned out they do.
This whole process was less intimidating than I expected, and would have taken about four hours if I’d skipped the third dye bath (which wasn’t necessary). That wasn’t four hours of work, though, since it’s just steeping, washing, and drying.
Making the Robe
I picked up the McCall’s “Space Nomads” pattern for reference, but nothing in it is quite right for a Jawa robe. I think Alysia used the large robe pattern as a reference for the sleeve cutouts, but apart from that the pattern wasn’t helpful.
We wound up just throwing the whole bolt of fabric over my head and adding a little extra on each end for good measure; that was about 5 yards total, leaving 2.5 yards for the other soft parts (sleeves, hood, and shoe/boot coverings).
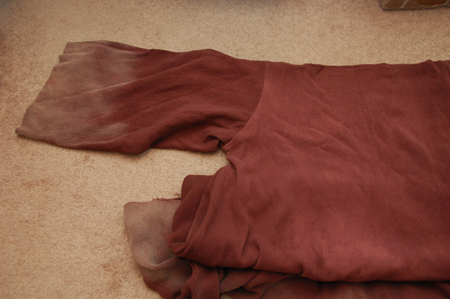
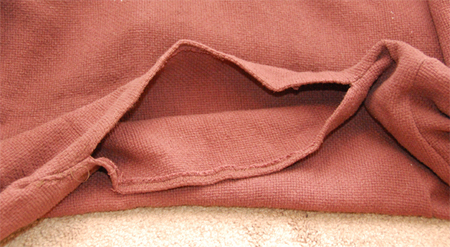
Then Alysia cut a 12″ lateral slit for my head in the center, pinned the fabric where it should fall from my shoulders, and cut out holes for the sleeves. For the sleeves, she threw spare fabric over my arm and pinned it so it flared a bit. I wanted a frayed hem and sleeves, so she sewed a reinforcing stitch 1″ from the edges and left it at that.
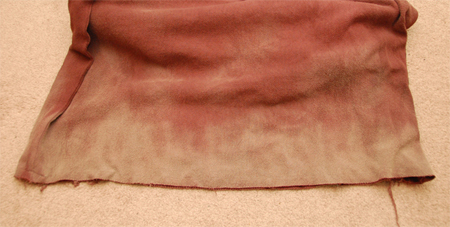
I then laid the robe in the grass, stretched the hem so it lay flat, and sprayed on the sand/dirt/weathering around the hem. After letting it dry for a few minutes, I flipped it over and did the other side; then I hung it to dry in the garage. (I wanted to just go roll in the desert dirt, but it was waaay too cold by this point in the year.)
Start to finish, the robe took about six hours to sew and 20 minutes to spray paint. (Monk’s cloth is thick and hard to work with, so be prepared for things to take longer than expected.)
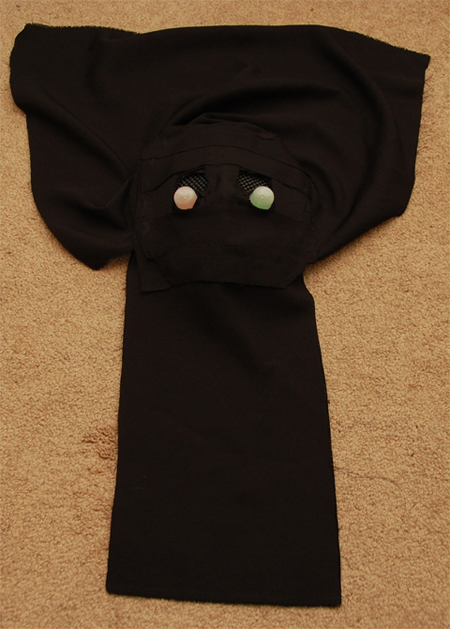
The Hood
The hood sucks to make — it’s fiddlier than it looks. Alysia draped fabric over my head and we spent quite a bit of time estimating the right size to get the perfect opening. The cowl portion needs to cover the neck slit in the robe and drape a bit in the front and back, but not too much.
We opted for the simplest closure, just a piece of velcro in the front. I’ve seen screen-used Jawa costumes with this closure, as well as ones with flaps that overlap in front.
She then lined the front portion with black cotton fabric (which enhances the effect of the eyes and helps keep you from seeing the mask), folded over the outer edge around the opening and sewed it up to accommodate the wire, and ran a reinforcing stitch around the hem. To keep the wire from poking through, she put a U-bend in each end.
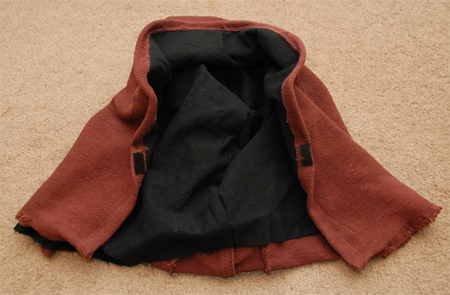
The hood requires a bit of adjusting to get it to drape properly, and a bit more to get the opening to look right. Once it’s on, though, it looks great and stays in place.
Start to finish, this took four hours.
The Mask
I followed TK409’s excellent mask tutorial, diverging only a bit from it, so this section will be brief.
I couldn’t find the right fuzzy stuff to cover the mask, so I just used some textured cotton/poly fabric. I glued on the neck cowl and separate head cowl, then covered the front of the mask with strips of fabric. Since the goal is never to see these, it’s kind of a Plan B: If you do see the mask, it should look rough, like the rest of the costume. The two cowls contribute to this as well.
I used electrical tape to keep the LEDs for the eyes in place, but I wish I’d found a better solution. I padded the cheekbones (which provides clearance for the LEDs) and forehead, which makes it a bit more breathable. Some folks install a CPU fan, but I couldn’t see how there’d be enough room for that in my mask. I wound up just taping the battery pack to the top of the mask, since I wanted the whole unit to be self-contained; I left the little door accessible for battery changes.
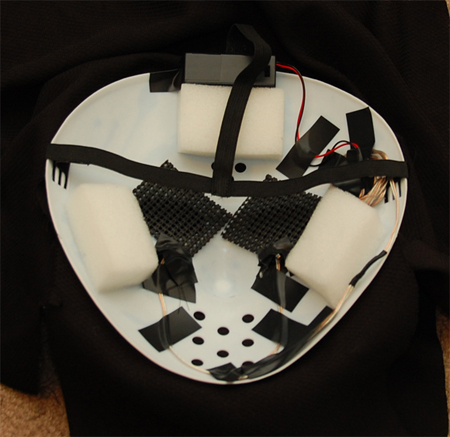
Once it was built, I realized I could have dropped amber vase gems into the ends of the eye capsules to create a more natural effect, but it was too late. If I did this again, I’d go that route or source some 1″ diamater vase gems (which I couldn’t find locally in time) and skip the capsules entirely.
The mask took about two hours to make.
The Shoes
Since I was working with a normal pair of shoes (Vans with laces), I put them on, made them a bit loose, and then double-knotted the laces. That way I could glue cloth to them and would still be able to just slip them on and off.
Using a triangle of monk’s cloth that could just about cover the whole shoe, I first glued it along one edge of the shoe so that it lay just above the sole line. I wanted it to make the shoe invisible but not drag any fabric on the ground; to be screen-accurate, I would have needed to fully wrap the shoe, including the sole (and it would have needed to be a boot, of course).
To make it look less like a bootie, I cut leftover pieces of monk’s cloth into strips and covered the whole thing in a hodgepodge fashion. To simulate wear, I sprayed sand-colored paint around the edges.
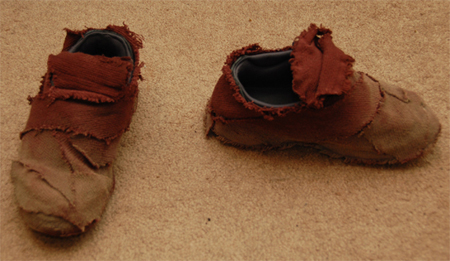
All told, this step took about an hour.
Weathering
I covered simulating weathering on the robe and shoes above — this section is about weathering the bandolier, ammo pouch, and belt. There’s a certain amount of letting go and saying “Fuck it” to this part of the costume. I had to take this awesome thing Alysia and I were working so hard on, and which cost quite a bit, and mess it up, which felt weird at first. But messing it up the right way is the thing that takes this costume — which is relatively simply in appearance, if not in construction — over the top.
After doing a bunch of research online, the biggest takeaway seemed to be that in order to weather something authentically, you have to consider how it would actually be used and then beat the hell out of it. I started by sanding all of the high points and edges — the spots where these items would naturally wear.
I erred on the side of caution, sanding a little instead of a lot and then returning to further distress some areas once I got the hang of it. Thinking how authentic the costumes in the Lord of the Rings trilogy looked, I also erred on the side of subtlety overall; like Lucas did in shooting ANH, I wanted the weathering to just look right, and therefore to disappear — IE, everything should look well-used, not artificially (or over-) weathered. Reading The Making of Star Wars, which goes into all that stuff, was a big help.
After I’d done all of the sanding, I basically just beat each piece up for 30 minutes. I rolled and unrolled fastener straps (the heaviest-used parts of the bandolier and pouch) and belts; twisted belts into a coil in one direction, then the other; folded belts the long way, and then back; rolled everything up and stood on it; crumpled things in random directions; broke in all the surfaces; made the pouches less perfectly squared off; and generally just had a good time — this was a lot of fun, and I think it turned out well.
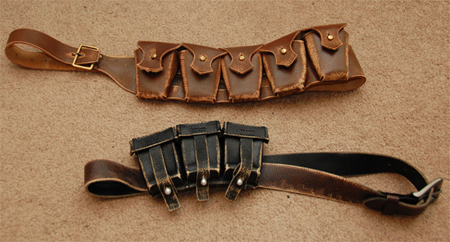
To achieve a naturally weathered and beaten-up look that I was happy with took me an hour per piece, so three hours total.
What I Skipped
While a droid caller, second bandolier (in place of the belt/pouch combo), and ion blaster with custom holster and power pack would have been awesome, I didn’t have the time or want to spend the money to do all that stuff this year. Using an actual Enfield rifle with grenade cup for the blaster, a Kobold flash unit for the caller, and a custom-made holster would have been expensive. I didn’t even know where to start for the power pack.
The slightly less expensive route is to use resin kit versions of the caller and blaster, which I found on eBay for around $20 and $60 respectively. Those would need a non-crappy paint job to really shine, though.
I also would have liked to be able to find convincing fur to stick on the wrists of the gloves, and to have had the time to do natural weathering on the robe and leather bits — IE, go roll around in the dirt — but I couldn’t make that happen this time around.
What It’s Like to Wear
This costume provoked great reactions — people loved it. After the amount of time, work, and money involved in making it, that rocked.
Most folks found the mask creepy, and it seemed to have about a 50/50 chance of frightening small children. My daughter Lark didn’t know what to make of it at first, but once I took off the hood and mask and she saw it was me, she got excited because she knew it was me under there.
On the flipside, it’s insanely hot to wear. The robe is heavy, which isn’t too bad, but the hood and mask combo gets miserable after about 10 minutes, as it features monk’s cloth, liner fabric, a cowl, and a fully covered mask you exhale into constantly.
Thanks for Reading!
I’m not a costumer, and in fact I usually really half-ass my Halloween costumes, but I’m glad for whatever put a bug up my ass about giving this costume a shot. It was a lot more work than I or Alysia expected, but it looks great and, I think, has most of the subtleties and authentic elements that make up a good screen-accurate Jawa costume.
I hope this tutorial was useful to you!
Man, I just want to say your Jawa costume was amazing. Your process is really comprehensive too. Thanks for posting this!
Thanks! I’m glad you enjoyed it, and I hope you give this costume a shot yourself. I had a lot of fun making and wearing it.
This turned out AMAZING!!!! Don’t have time to do this for my boyfriend this year- but I’m excited for next year!!
I’m glad you like it! If you do make it next year, I hope you’ll share some photos of how it turned out.
Pingback: Star Wars – Jawa
Thank you so much for posting all of this! This is such a valuable asset for me as I too want to join the ranks! :D
Thanks so much for posting this nice detailed account. You have saved me a lot of time! I am making a costume for my son…who is about average size for a jawa:)
Happy to help!
I know this was posted forever ago, but heres a tip from a 501st member ;) Cut the mask off below the nose…this way your not trapping the hot air you create when you exhale…this cuts down on the discomfort dramatically depending on the fabric you used. ALSO black cotton gauze works wonderfully to cover the mask in WITHOUT the need for the place mat mesh around the eyes. It also looks cleaner. Attach the material to the mask with cloth gaffers tape. :)
Thanks! I’m not sure how I’d attach the fabric to the outside of the mask if it weren’t whole, but with some experimentation in how much to cut, I could see it working out well. It’s super-hot under there; anything to make it cooler would be good.
I didn’t even know black gauze existed — that sounds much better than placemat webbing!
While this post is old, I’ve worn the costume within the past year, and will likely wear it again. The post itself is the second- or third-most viewed on the blog, too — folks still read it, and tips like yours are always welcome!
Pingback: star wars jawa costume pattern