I snapped these back in January, of stuff I finished in December of 2022, and then forgot about them until now.
Sector Mechanicus dome/stack
I had a lot of fun building this piece. All of these sets interconnect so well that it’s satisfying to play around and find ways to work in “off-book” connections.
Ferratonic Furnace
I have a couple of these, so I felt free to assemble this one as a single piece — no modular lid. The Wraithbone railings and pipe fittings tie it to my Sector Manufactorum terrain.
There’s something therapeutic about drilling little bullet holes in terrain.
To matched the blasted and ruined look of my Manufactorum pieces, I added battle damage to the railings.
I assembled the platform and railings such that it can play nice with almost any walkway piece. The corner with the hazard stripes has a bite taken out of it with my hobby nippers.
Sector Mechanicus walkway
I clustered the railings in the center, leaving both ends and the “sides” of the ends free to connect with other walkways.
All of my ladders are carefully placed to as to mostly play nice with other terrain pieces.
I wanted this to fit in with my blasted-up Manufactorum stuff, so I used clippers and my hobby knife to tear chunks out of the platform. I kept the holes small enough to avoid being hazards for the actual miniatures.
Thermo-Exchanger Shrine and miscellaneous tank
Shipping containers and misc. bits
The bottoms are fully painted too, but not interesting enough to photograph. I paint the bottoms because these are so modular that they look good at weird angles, on their sides, etc.
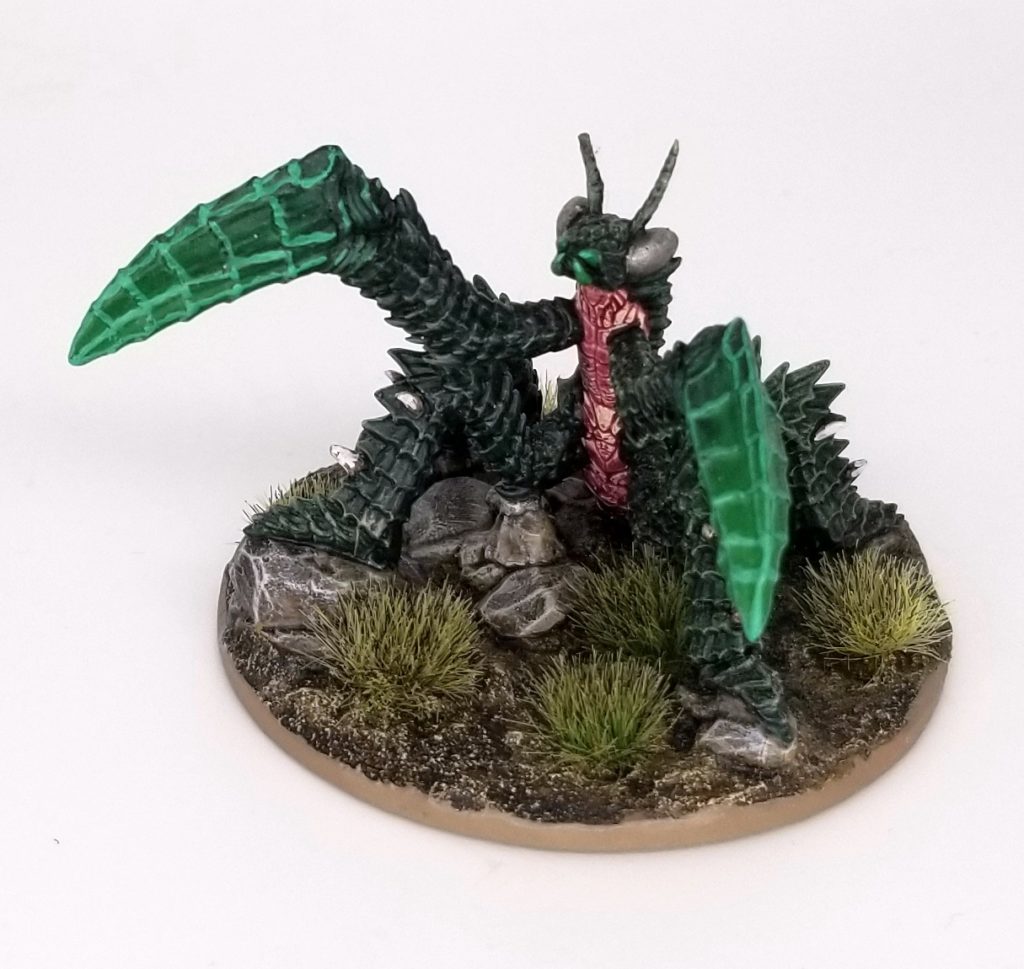
Giant dire mantis
My kiddo, Lark, loves preying mantises, so I painted this giant dire mantis (a 3-D print I bought on Etsy) as a Christmas present. I used some glazing and progressive drybrushing layers to try to make it look natural, and the overall model uses something like 19 colors. It was a ton of fun to paint.
And that’s it, I’m all caught up! Now back to assembling Brôkhyr Thunderkyn for my Votanni army.
Out now: The Unlucky Isles
The Unlucky Isles [affiliate link], the first system-neutral guidebook for my Godsbarrow fantasy campaign setting, is now on DriveThruRPG.
I started my 40k terrain collection with pieces from the Manufactorum line, and then added a bunch from the Sector Mechanicus line — enough stuff that, if I built all of it, I could kit out a 2,000-point 40k board. My plan has always been to find a paint scheme that unifies these two themes, and after looking at lots of possibilities I settled on this one.
My goal here isn’t to replicate the studio paint schemes for Mechanicus terrain (although they’re great!), it’s to make my bombed-out table full of a mix of Manufactorum and Mechanicus pieces looks cohesive. I’ve gotten ideas from Warhammer TV videos and Google searches, referenced Citadel’s mini-guides for specific colors (e.g. Deathworld Forest), and used my Manufactorum color guide as my baseline.
In the dark future there are no bare bottoms
Tying Sector Mechanicus to Battlezone: Manufactorum
My approach is to follow these steps in this order. That entails a rattle can primer/base coat, tackling the biggest sections, completely finishing everything but the tiny details (pipes, plaques, handles, screens, wires, and the like), then doing those details (with no wash/highlight steps for them!), and lastly weathering the whole piece.
Spray everything Leadbelcher. Tackle each piece in two stages: broadly, top and bottom. Flip them over and wait 15 minutes before spraying the second stage.
Big stuff:
Stanchions and gantries: base coat the tops of the gantries Deathworld Forest (over the existing Leadbelcher primer/base coat); touch up any overspill with Leadbelcher; wash the stanchions and both sides of the gantries, starting with the undersides and waiting an hour before doing the rest; and then completely finish these sections (all the way up to top-level drybrushing). That way I can be messy with my washing and drybrushing before painting the other elements.
Tops and edges of gantries: Deathworld Forest > Agrax Earthshade > Elysian Green drybrush > light Screaming Skull drybrush
Red metal (large plates, tanks, doors, some pipes): Khorne Red > Nuln Oil > Wazdakka Red drybrush > very light Squig Orange drybrush
Railings and large pipe joints (compatible with Manufactorum pipes): Wraithbone > Seraphim Sepia > Agrax Earthshade pin wash along seams/wherever they’d be really dirty > Tyrant Skull drybrush > Praxeti White drybrush, focusing on the high points and edges
Bare metal (ladders, chains, hooks, etc.):Agrax Earthshade > Ironbreaker drybrush > Necron Compound drybrush
Bronze: Warplock Bronze > Agrax Earthshade > Brass Scorpion on the relief elements
Big 3-D Cog Mechanicum: The metal elements are already done (silver spray, wash, drybrushes).
White: Corax White > Apothecary White contrast paint > light Praxeti White drybrush
Small Cog Mechanicum: The metal elements are already done (silver spray, wash, drybrushes), and these are all too awkwardly situated for me to do much else to — so I keep them simple.
White: Corax White > thinned-down Agrax Earthshade wash in the recesses
Black: Abaddon Black
Hazard stripes: Averland Sunset/Abaddon Black (use 3mm Vallejo hobby tape to mask them off) > very thin Agrax Earthshade wash to dial them back a bit
Little details (wires, conduits, screens, etc.): Base coat in a single color (Averland Sunset, Macragge Blue, etc.) and vary these choices across the terrain pieces (especially duplicates!); it sounds like heresy, but these truly don’t need any follow-up coats/layers/etc.
Weathering:
Rust: Thinned-down Skrag Brown > thinned-down Fire Dragon Bright
Verdigris: Nihilakh Oxide on bronze elements
Bullet holes: Shade them with the rest of whatever surface they’re on, then at this stage just fill them with Leadbelcher
Chipping and damage: Sponge on Rhinox Hide, focusing on the blasted edges and torn-away elements, but also randomly putting it everywhere that feels right
If you like this color scheme/approach, there’s nothing about it that’s unique to my setup; it should look dandy without the Manufactorum pieces to complement it.
Note that during assembly I’ve added battle damage and decay to my Mechanicus pieces: holes in gantries, missing ladder rungs, bullet holes, smashed railings, etc. My rules of thumb are: no section of gantry intended to mate with another at the table should be too badly damaged, as that would look weird if the other side didn’t match; and don’t overdo it. These aren’t ruins, like most of the Manufactorum pieces, but they have seen some shit.
Drilling holes and taking big bites out of my gantries (April 27, 2022)
My hope is that the mix of ruined and intact pieces, which is common to both terrain themes — out of the box in the case of Manufactorum, and added by me in the case of Mechanicus — will make the whole battlefield cohesive, immersive, and fun to look at.
Out now: The Unlucky Isles
The Unlucky Isles [affiliate link], the first system-neutral guidebook for my Godsbarrow fantasy campaign setting, is now on DriveThruRPG.
I’m currently working on three things in parallel, all at different stages: my second Hive Fleet Balaur unit for Kill Team, three Tyranid Warriors; a batch of Manufactorum terrain; and a couple of larger Sector Mechanicus terrain pieces.
Tom Servo of Finland watching over three freshly-glued Warriors
These guys were every bit as fun to build as my Genestealers. And despite having no names, no personalities, no quirky equipment — none of the stuff I’m used to using as my roleplaying hooks for how to assemble and paint an interesting figure — these models are packed with opportunities to convey intent (nom nom nom), motion, and character.
I’m honestly surprised how much I enjoy building and painting Tyranids.
My Tyranid Warrior Fire Team: Venom Cannon, leader, and weapon beast
Since I’m combining pieces from two lines, Manufactorum and Mechanicus, for my table, I started out with the Mechanicus stuff by just faffing about and seeing how it looks alongside my Manufactorum pieces.
I love how modular the Mechanicus terrain is
Alongside creating interesting terrain, my goal is to balance the modularity of the Mechanicus kits with a desire for durable, functional pieces I don’t need to fuss with.
These kits can be painted in pieces and assembled at the table, then broken down and reassembled a different way the next time. But some of the elements, like the railings, are going to mar whatever you attach them too — and in any case, that level of modularity seems like overkill to me.
So instead I built four anchor pieces, all of them fully assembled and glued — and all of them capable of being combined in lots of different ways. I left space for a Ferratonic Furnace under the octagon at the back, but glued my second furnace to the platform up front. The long gantries can each accommodate one or two of the larger Mechanicus tanks being slid under them, and almost all of the “mating” ends of the gantries and platforms can be mixed and matched.
This took a couple of hours, but I’m happy with how my pieces turned out.
My four anchor pieces (just press-fit at this stage, not glued)
After sleeping on my choices, I tweaked a couple things here and there, picked two to start with, and got them glued together.
The Ferratonic Furnace and platform will be glued together after I’ve sprayed them both (to make it easier to reach all the little crannies behind the ladder, cables, etc.)
Then I shifted gears and did the first wash on four Manufactorum pieces I’d previously primed, with an eye to finishing a full Kill Team board worth of terrain as soon as possible.
I’ve yet to figure out the secret of not being messy with terrain washes
It’s a weird angle, but this is my current overflowing work area: freshly washed Manufactorum pieces at the bottom, a mix of finished and WIP Tyranids and terrain in the center, and my first two huge Mechanicus pieces waiting for a dry day so I can spray them.
My desk hasn’t looked like this in months, and I love it!
Shifting from working on 2,000-point 40k armies to Kill Team squads has been just the ticket for getting me jazzed about painting again. It’s also helped me find something to focus on with terrain, since I’ve got a much shorter-term goal than filling a Strike Force board: one Kill Team board, which is maybe 4 large pieces, 2 medium ones, and a handful of little bits.
Out now: The Unlucky Isles
The Unlucky Isles [affiliate link], the first system-neutral guidebook for my Godsbarrow fantasy campaign setting, is now on DriveThruRPG.
I’ve been chipping away at some stuff, recovering from my sprint to wrap up my Killa Kan by the end of 2020.
Remember when I said version 3.0 of my Warlord, Moonkrumpa, was his final form? I was wrong!
Moonkrumpa 4.0, probably the final version
I realized how off it felt to have the leader of an army of Orks with expressive, fun-to-paint faces be wearing a mask. Since I had a second Meganobz kit on hand (if you build a Big Mek, the two remaining Meganobz don’t comprise a valid 40k unit…), I popped his head off and replaced it with the unmasked version. This might actually be the end of the road, since I primed him shortly after taking that photo.
I’ve also been building the biggest 40k thing I’ve ever built, the Sanctum Administratus.
The incomplete bottom level curing
This thing is massive. The bottom level is something like 8″x8″, and it’ll be around a foot tall when I have the next two levels on there. The multipart walls are a bit fussy, but I thought about it and decided to build the whole level in a rush so I’d theoretically have time to adjust before it all dried. That worked pretty well, although I did leave run of the floor/ceiling about 1mm too high.
More Administratus pieces, my Deff Dread, Moonkrumpa, and a Grot Oiler
Working on this piece prompted me to think about how much more terrain I might need, so I did some digging. After reading (and re-reading) lots of contradictory advice, some of it based on previous editions, it hit me that I could just read the rules and see what they said about terrain. As it turns out, what they say is that I already have almost enough terrain for a 44″x60″ Strike Force board.
All that puzzling-things-out resulted in a major update to my 40k terrain page, which now links to finished scenery and lists all of my pieces in ways that should be helpful when deciding how to lay them out for play. I think I really just need one more large terrain piece, ideally one that ties the Manufactorum and Mechanicus elements I already have together, to have a pretty solid Strike Force set (less the additional boards, which I still need to buy).
Speaking of terrain, I stumbled across a post by GW terrain designer Ray Dranfield on Twitter in which he suggested not gluing the second story of your buildings because the Sector Imperialis pieces are designed to be swappable, and I had a thought:
Imagine these two pieces painted in the same color scheme
I’ll be damned! Fits like a glove. The interior floors look totally different, but the column spacing is identical and the Imperialis column tops and Manufactorum column bottoms are grooved to mate perfectly. This particular pairing doesn’t make a lot of sense (there’s a door to nowhere on the second floor…), but I’ve got some other Manufactorum pieces that would look right at home up there.
Of course, the second thing I thought of was dropping in a few magnets for added stability…
Out now: The Unlucky Isles
The Unlucky Isles [affiliate link], the first system-neutral guidebook for my Godsbarrow fantasy campaign setting, is now on DriveThruRPG.
In 2020, I became a miniature-painter. Prior to February, I was a guy who sometimes painted miniatures and generally didn’t especially enjoy it. But this year I painted more minis than I had in my 30+ years of sporadic painting prior to 2020 — almost twice as many, in fact. So I’m still a beginner, in many (many!) ways, but not quite as a green as I was before.
All of the miniatures I painted in 2020
Before I get into stats and silly stuff I kept track of, though, I want to pause to write about the pandemic.
Yore isn’t a news or current events blog (there are many better places to go for that sort of info and content), so I haven’t really blogged about the Covid-19 pandemic. This is one of my refuges, and I hope that perhaps it’s been one of yours.
The toll this virus has taken is staggering: over 340,000 dead in the US alone. More than 418,000 Americans died in World War II; that we’re likely to match that total before herd immunity is reached, and with so many of these deaths being preventable, is heartbreaking.
If you’ve lost someone this year, my heart goes out to you. I can’t imagine what that must be like, in the midst of all of this. If you’ve lost your job, your peace of mind, or any measure of stability, I am so sorry for that loss. Whoever you are, reading this right now, I hope things improve for you and yours.
Miniatures by the numbers
In 2020 I finished painting the following models (I’m not counting assembled, primed, or partially painted minis — just varnished and ready for play):
A full quarter of my output was in December, when I set a personal record: 26 miniatures in one month. I know that’s small potatoes for dedicated hobbyists, but it’s a lot for me!
My overall favorite miniature that I painted in 2020 is also my last one of the year: Mukkit, my first Killa Kan. It’s not just recency bias, either; I poured everything I’ve learned about painting into this guy.
Mukkit the Killa Kan
I got out the first miniature I finished in 2020, Brother Scipio from Space Hulk (2/27), and threw them in the lightbox together for a first/last comparison shot:
My first (L) and last minis (R) of 2020
My MVP brush for the year, the Citadel S Layer — which I bought before learning that animal-hair brushes were a thing — finally died at the end of December. I replaced it with a Princeton Velvetouch size 0 Round, an excellent synthetic brush with similar characteristics. This size has become my workhorse, handling everything from edge highlights to base-coating details to eyes.
I spent about 10 months painting 2,200+ points of Blood Angels (November 2020)
I learned a lot about painting this year. I still have a lot to learn, and a lot to continue improving upon. Painting was a real source of joy for me in 2020. Capturing that joy and that learning process here, and hopefully in ways that might be useful to other painters, has been a lot of fun as well.
I like tracking stuff
A few other stats I’ve kept track of:
Hobby streak: From the day I started painting again to the end of the year, I maintained an unbroken hobby streak of 314 days. Doing at least a little bit of assembly/priming/painting every day played a huge role in keeping me motivated and moving, and in getting this many minis done.
Hand-washing: Since mid-March, I’ve recited my Covid-19 hand-washing mantra — the opening narration for Star Trek: The Next Generation — approximately 950 times. (I don’t, like, log this or anything; I’m backing into my total based on an average of 3x a day since March 12, when we went into isolation.)
Audiobooks: Having gotten into audiobooks at the same time as 40k, and explicitly as an accompaniment to painting, I listened to 15 excellent 40k books this year (almost all of them by my favorite author/narrator pairing, Dan Abnett and Toby Longworth). Favorite titles include Ravenor (Ravenor v.1), Necropolis (Gaunt’s Ghosts v.3), and Brothers of the Snake.
Movies: I watched 183 movies, 44 of which were 2020 releases. Birds of Prey was my favorite 2020 film, and the last thing I saw in the theater; I hit four viewings by year’s end. (I log and comment on every movie I’ve seen on Letterboxd.)
Music: I listened to 52 hours of music, all on Spotify; genre-wise, hip-hop and electronica were my top two. My favorite 2020 releases were Birds of Prey: The Album (various artists), HOUSE OF ZEF (Die Antwoord), and BE (BTS), and dang if that isn’t a decent snapshot of my musical tastes.
RPGs: I played 87 RPG sessions, 27 of which were solo. I only played one 2020 release, Brindlewood Bay; it’s a hoot. Unusually, it’s the first game I can remember that both of my groups are playing at the same time.
Blogging: I wrote 166 blog posts, about 40% of my total output here on Yore since 2012. 2020 also marks the year when Yore crossed the tipping point from being primarily about tabletop RPGs (166 posts as of December 8) to being primarily about minis and my hobby journey (the 167th minis post was on December 8).
Here’s to 2021
While I doubt we’ll get “back to normal” in 2021, I think things will start to look up in the spring and summer, and playing 40k seems like it could happen next winter. (I’m last in line for the vaccine, as I should be, and my family’s bubble, distancing, mask usage, and other precautions don’t seem likely to change for months.) But there’s ample reason to hope for a better year, and hope for it I do!
Thank you for reading Yore. Stay safe out there.
Out now: The Unlucky Isles
The Unlucky Isles [affiliate link], the first system-neutral guidebook for my Godsbarrow fantasy campaign setting, is now on DriveThruRPG.
I’m in my sprint to see how many minis I can book in 2020, and this ruin — the largest piece of terrain I’ve ever painted (although it’s a medium-sized piece) — brings my December total up to 25.
I’m not sure how best to photograph terrain. My lightbox wasn’t going to work because the ruin’s floor would block the light — so I took it outside for some shots in natural light.
Exterior, long sideExterior, short endFloor from aboveInterior
I started this piece back in November, and it took me so long to paint the details that I took a break…during which I assembled oodles of models and painted 11 Orks and 10 Gretchin. So not a short break. But, recharged and refreshed, I pushed through the final details and then the weathering — and on the whole, this was a really fun project.
Painting this piece also helped set my expectations for painting more terrain, notably in that I now know just how long it will take me to fill a 4’x6′ Strike Force-sized board. I’m going to start with trying to fill a Kill Team board, then a Combat Patrol board, and then see where that takes me. There’s no pressure, really; the odds I’ll need it in the next 12 months are slim, I’d say.
Next up is a Killa Kan, and I’m pushing to see if I can finish it by 12/31. This Kan, Mukkit, was primed on 12/28 and based and partially base-coated on 12/29, so it might be doable!
Out now: The Unlucky Isles
The Unlucky Isles [affiliate link], the first system-neutral guidebook for my Godsbarrow fantasy campaign setting, is now on DriveThruRPG.
While puttering away at this terrain, I stumbled across a battle report in White Dwarf #456 which features this same Manufactorum line. The view from above, unlike the photos on GW’s website, finally showed me what was going on with the middle of each ruined floor: hazard stripes!
I laid down some 3mm Vallejo hobby tape and got to work.
Let’s get stripeyOne down
After two thin coats of Averland Sunset, I peeled off the tape and drybrushed the entire floor with Celestra Grey (stripes included).
Two down, and both weathered with a Celestra Grey drybrush
I didn’t worry too much about lining things up perfectly, or the difference between the “horizontal” and “vertical” portions (a natural consequence of my taping pattern). In the grim darkness of the far future, a Manufactorum would be a dreadful place — and an imperfect one.
When I started this terrain, I was listening to Dan Abnett’s Ravenor Returned, a portion of which takes place in an Administratum facility. Alongside the general impression of how miserable the place was, there was a bit where a character complains that his cart has a dodgy wheel — and his supervisor tells him that if he works hard for 10-12 years, he’ll merit a better cart.
That sequence colored my approach to this terrain, just as Brothers of the Snake (another excellent Abnett book) did with Squad Ariete. Those happy coincidences are one of the joys of listening to 40k books while I paint.
Out now: The Unlucky Isles
The Unlucky Isles [affiliate link], the first system-neutral guidebook for my Godsbarrow fantasy campaign setting, is now on DriveThruRPG.
Today I wrapped up three small terrain elements, a ruin and two pipes, from the Vertigus set — the first terrain I’ve ever painted.
A ruined wall sectionInterior viewThe panel on the right, covered in rust and verdigris, is my favorite bit
Weathering is a hoot. Applying Nihilakh Oxide for a verdigris effect just makes me happy. Rust (thinned-down Skrag Brown followed by spots of thinned-down Fire Dragon Bright) is surprisingly interesting to work on.
Weathered on the right, not-yet-weathered on the leftComing along nicely
Adding chipping/scorching/blast damage with a sponge (loaded with Rhinox Hide), though, feels like sorcery.
Sponge me, daddy
It’s also more freeing than I expected. I was nervous at first, as usual with techniques I haven’t tried before; intentionally “ruining” something I’ve worked hard on felt funny. But once I was rolling, it was surprisingly easy to pull off a decent job, and it felt organic. Alysia commented that this process seemed “very Bob Ross,” and that was definitely the spirit in which I tackled this stage.
What fell magick is this?Fell magick (interior view)
I have my first two larger ruins about 60-70% done. I’m finding that after the initial one-two punch of prime/base coat in one plus a wash — after which they look pretty danged good — the rest of the steps go much more slowly. But I’m hoping to finish those two pieces later this month.
Out now: The Unlucky Isles
The Unlucky Isles [affiliate link], the first system-neutral guidebook for my Godsbarrow fantasy campaign setting, is now on DriveThruRPG.
After assembling, priming/base-coating, and doing the initial wash on my Manufactorum terrain pieces, I tucked into the next steps — and realized it was time for a guide to those steps, and the colors I’m using, so that Future Martin can replicate it all on the next batch.
Chipping away at some terrain following the steps in this guide (walls and floors are finished except for weathering; metal, windows, and all small details remain)
These videos are a tremendous resource and I love that GW makes them available. There’s no way I could approach the finished quality I want in my terrain without them.
Painting steps
Terrain is a different animal, so it requires different steps in a different order. This looks like a million steps, but it’s really quite a relaxing painting process; I’ve just broken it down, for my own benefit, because the process is different than the one I’ve spent the last nine months employing on my Blood Angels.
From step 2, floors: both have been shaded, and the one on the right has been drybrushed as well
Step 1 basically takes the bulk of the terrain piece — the stone elements — to completion, which is done to avoid messily washing and drybrushing other stuff the wrong colors. Step 2 does the same for the floors, and so on. The final step, number 7, involves weathering that goes back over many of the areas completed in 1-6 — and apart from varnish, it’s genuinely the last step.
“Don’t overdo it” is my mantra for most of the steps. It’s easy to want the whole building to look super-grimy at the shading stage — and forget that there’s grime and character still to come, at later stages.
Walls:
Wraithbone spray, primer and base coat in one
Seraphim Sepia wash almost everywhere; err on the side of “everywhere,” not “almost”
Agrax Earthshade pin wash along the “bands” of the pillars, plus randomly anywhere else that would have gotten especially dirty while these buildings were in use (or weathered after they became ruins), notably under doors and junction boxes, as well as along conduits — and throw in some random spots, too
Drybrush all Wraithbone areas with Tyrant Skull, in a circular motion; this is designed to go everywhere
Then a lighter Praxeti White drybrush over that, in circular motions, pressing lightly and just hitting the high points
Floors:
Bung Leadbelcher into the holes in the floor (which hits the pipes and suggests that the floors are metal gratings with a coat of paint over them) > Mechanicus Standard Grey on the flat parts of the floor and the entire underside > Agrax Earthshade > Dawnstone drybrush the flat sections of the floor in circular motions, top and bottom
Paint hazard stripes along the centerline of the floor with Averland Sunset (using 3mm Vallejo hobby tape for masking)
Light drybrush with Celestra Grey on the top and edges, including the hazard stripes (skip the bottom)
Other little details (wires, etc.): Base coat in a single color (Averland Sunset, Macragge Blue, etc.) and vary these choices across the buildings (especially duplicates!); it sounds like heresy, but these truly don’t need any follow-up coats/layers/etc.
Weathering:
Rust: Thinned-down Skrag Brown > thinned-down Fire Dragon Bright
Verdigris: Nihilakh Oxide in the crevices on bronze elements
Chipping and damage: Sponge on Rhinox Hide, focusing on the blasted edges and torn-away elements, but also randomly putting it everywhere that feels right
This guide is written for the walls, but it applies to the pipes, sacred radiators, and whatnot as well. The only real changes are obvious stuff, like applying the Agrax Earthshade pin wash to different parts of the pipes.
Munitorum Armoured Shipping Containers, crates, and barrels
I based my approach to these on 1) the primary colors I hadn’t used yet, which 2) were available in rattle cans.
Shipping containers, crates, and barrels: Pick one:
Blue: Spray on Macragge Blue > Nuln Oil all-over wash > Altdorf Guard Blue drybrush > Calgar Blue drybrush
Green: Spray on Death Guard Green primer/base coat > Agrax Earthshade all-over wash > Warboss Green drybrush >
Grey: Spray on Grey Seer primer/base coat > Agrax Earthshade all-over wash > Ulthuan Grey drybrush > light White Scar drybrush on the high points
Rust: Thinned-down Skrag Brown > thinned-down Fire Dragon Bright
Bullet holes: Shade them with the rest of whatever surface they’re on, then at this stage just fill them with Leadbelcher
Verdigris: Nihilakh Oxide in the crevices on bronze elements
Grime and damage: Sponge on Rhinox Hide
I winged it on the green, which isn’t the most logical color combination — but looks like it has seen some shit (which fits my vibe) and is distinct from the green I use for the floors of my Sector Mechanicus terrain.
Out now: The Unlucky Isles
The Unlucky Isles [affiliate link], the first system-neutral guidebook for my Godsbarrow fantasy campaign setting, is now on DriveThruRPG.
On Sunday morning, I picked up where I’d left off with my terrain on Saturday: Wraithbone done, all-over Seraphim Sepia wash. Next up was a pin wash with Agrax Earthshade.
The pin wash is subtle, but I like the effect. Both of these pieces have had their all-over Seraphim Sepia wash, but the one on the right has had some grimy areas pin-washed with Agrax:
Before (left) and after (right)
I used a cheap #5 brush for the pin washes.
Pin-washed sacred pipesDang but I love this terrain! The sculpts are greatBunging Leadbelcher into the holes in the flooring
I was a bit nervous about doing a full-coverage drybrush over my precious washes…but it turned out to be no biggie. And as the video notes, it looks quite subtle at first but it does actually make a difference.
I used my giant flat-edged 5/8 brush (the cheap one I used for the washes) for this messy, brush-killing job.
Pre-drybrush on the left, post-drybrush on the right
My buildings are noticeably darker than the ones in the video at this stage, which I think comes down to the thinned vs. straight wash. I dig it. Next up, a lighter drybrush with Praxeti White, same brush and same circular motions.
This is subtle, too, but in this case I’m just not that confident in my technique. Both the amount of paint and the weight of my brushing make a difference, and I’m not there yet in terms of experience — but even so, it’s a nice effect.
Praxeti White drybrush on the left half, but not on the right half (yet)
And that’s the stone done! (Except for, maybe, a final weathering step of some sort.) Warhammer TV didn’t steer me wrong: two washes and two layers of drybrushing really does tidy things up and produce an organic, lifelike weathered stone — and surprisingly quickly, too.
Next up, Mechanicus Standard Grey on the floors (top and bottom), applied with an inexpensive flat-edged #5 brush.
Floors mostly base-coated, above and below
That’s where I ran out of steam for the night, after a pleasant Sunday spent almost entirely working on this terrain or futzing with my Orks’ basing colors. Next terrain-painting session, I’ll finish the edges and borders on the floors, wash them, drybrush them, and then move back to the walls to work on details.
Out now: The Unlucky Isles
The Unlucky Isles [affiliate link], the first system-neutral guidebook for my Godsbarrow fantasy campaign setting, is now on DriveThruRPG.